For those who have installed a VLF monitoring station it is only one more step to put MP3 streaming audio on-line to the world. It is also a great opportunity for other researchers to listen to and process your signal as well. This has only become possible within the last few years. Now we look at the steps required.
 |
 |
The shopping
list
Here is the list of things needed to activate a
monitoring station on-line.
- an active VLF Observatory (see the article “How
to start up a VLF observatory”)
- an ADSL connection with a flat account (the same
used for the On-line observatory)
- some free software: Icecast, OddCast, Lame...
but a complete list will follow
- again: much dedication and... a bit of good will
FIND YOUR LOCAL
AND PUBLIC IP ADDRESS
If you are directly connected to the Internet with
a modem, or if you are connected to a LAN, you must know your IP addresses:
it is necessary for subsequent operations. To find your local IP open a
DOS Window:
(Remember you can use Google to convert Italian to your own language as needed)
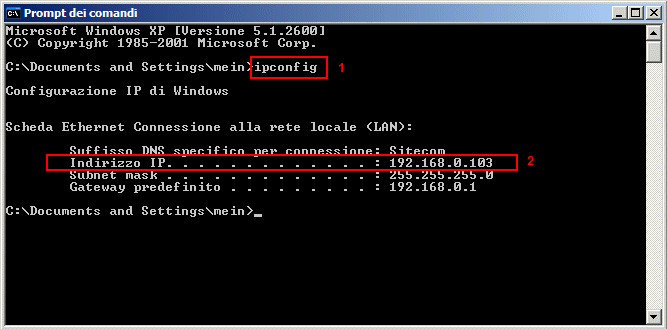
Type the command “ipconfig” and press “ENTER” (1)
The DOS window will show some data, including the
IP Address (2)
In the example above it is “192.168.0.103”: this
is your local IP address.
To find the Public IP address you can use one of many web sites available for this service. Open Google and type: “what is my IP address” and choose one of the web sites. One, for example is: http://www.myipaddress.com/
Accessing the home page this web page shows you the IP public address:
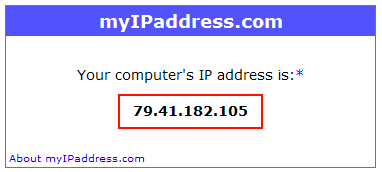
In the example “79.41.182.105” is the IP public address.
If your PC is connected directly to the web by a modem the two addresses will be the same: your public IP and the local IP address will be identical. If you are using a router your public and local IP address will be different as in example above.
Take note of the addresses we have found: we need
them later.
AUDIO STREAM
SERVER
Taking the example of a classical radio station,
there are two basic parts: the low frequency (disk drives, servers with
songs, audio tape ...) and the high frequency (radio transmitter, antenna,
a frequency to tune. ..). The low frequency is the audio signal source,
the high frequency is the carrier through which the low frequency is distributed.
In web streaming we have the same function, realized by:
- an Audio Stream Server software, it is the “web
transmitter”
- MP3 Coded software, it provides the MP3 audio
signal source to the “web transmitter”
As in a FM broadcast station we tune a transmitter,
in a MP3 web station we point to an Audio Stream Server. Let's activate
our free server, called Icecast. Download Icecast from here:
http://www.icecast.org/index.php
download the executable file icecast2_win32_2.3.2_setup.exe and run it. The installation starts: always confirm the various questions until the end of the installation. Click on the Icon “Icecast2 Win32” on your desktop and open the stream server control window.
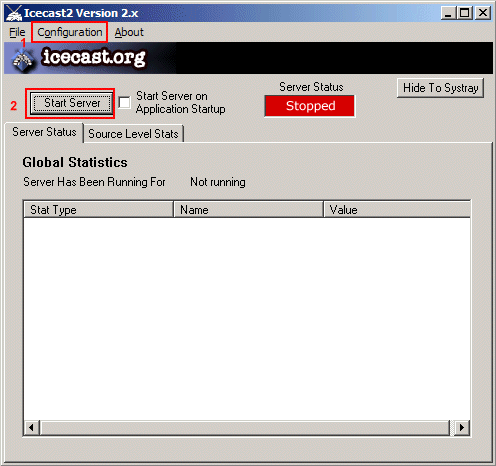
Click on “configuration” (1): a text window opens
with minimal setup/configuration.
You can change it or leave it as is.
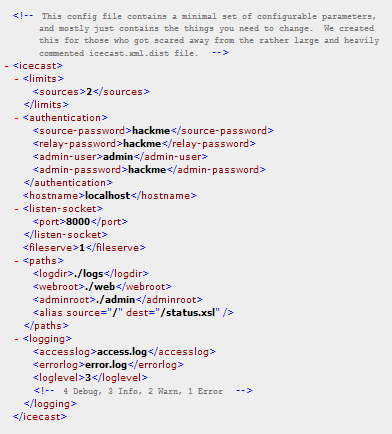
There is important information in this file:
- the passwords: “hackme”
- the admin user: “admin”
- the host name: “localhost”
- the used port: “8000”
...that we can change. For a more complete set of parameters, read the instructions of the program: http://www.icecast.org/docs/icecast-2.0.1/
Now click on “start server” button to run the server.
Now the server should be active.
Check it by opening a web browser:
http://localhost:8000/status.xsl
(or: http://192.168.0.103:8000/status.xsl
use the Local IP address we found first)
You should see a page like this:
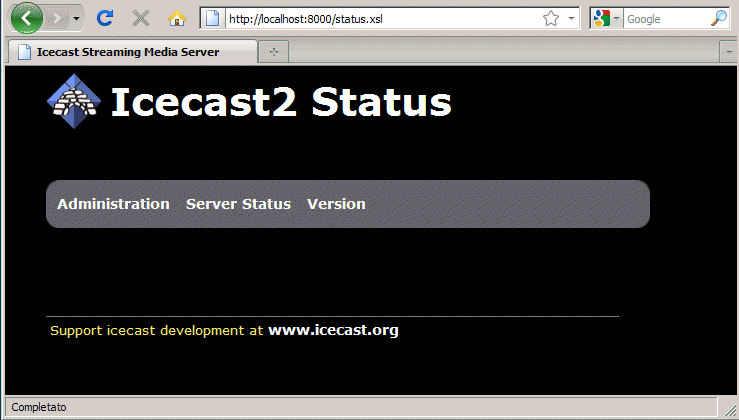
This will be the control page of our server. Currently
there are no active streams of services because we have not yet activated
the source. Clicking on the page of "administration" will ask userid and
password: they are "admin" and "hackme" we have seen above. We can change
them by editing the "configuration" file opened in IceCast window, we saw
first.
THE AUDIO ENCODER
To put an audio stream on line we need codec software:
this transforms an audio source, such as microphone, line input or musical
file/sounds from a player ... in an MP3 format, good for IceCast. There
are several software that can perform this function: VLC, EdCast, But ...
let's first see how to configure it.
Download the application from this web site: http://butt.sourceforge.net/
and run the installation file: “butt-0.1.12-win32.exe”.
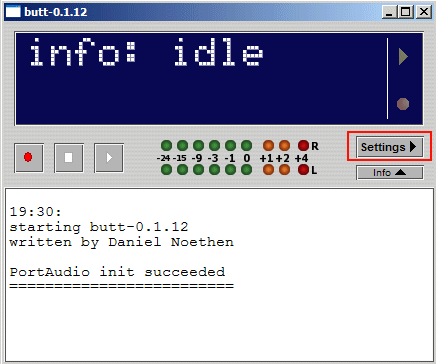
When the installation finishes we start the program that opens the main
window.
 |
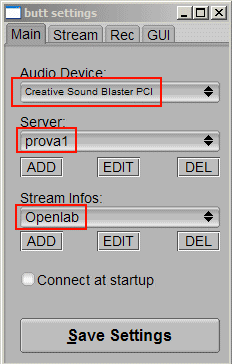 |
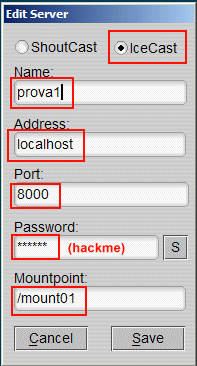
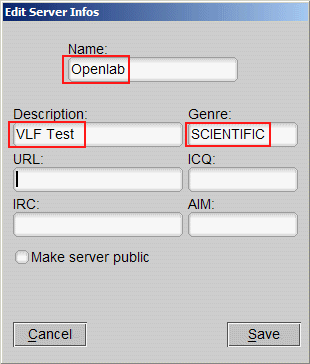
Clicking on “settings” we can put the configuration
parameters in, starting from the audio device we want as the signal source,
and following with all others parameters:
 |
 |
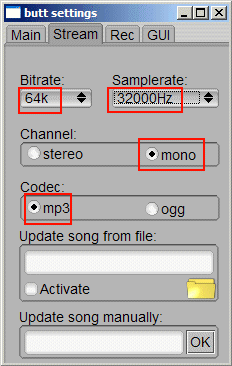 |
The images above are an example of how we can configure the program. Some parameters are open to choice, others must be the same as configured in IceCast: address, port number and password. Finally we also configure the parameters of the stream. The upload bandwidth provided by ADSL line conditions the values that can be used: An ADSL line with 240 Kb in upload will not handle more than 3 users connected to your stream: 240 Kb / 64 k bitrate = 3.75
Now we can run the program by clicking on Play button:
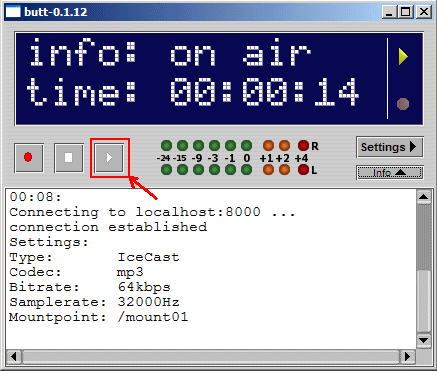
the windows info shows the connection parameters and reloading the IceCast status web page http://localhost:8000/status.xsl
we find this one:
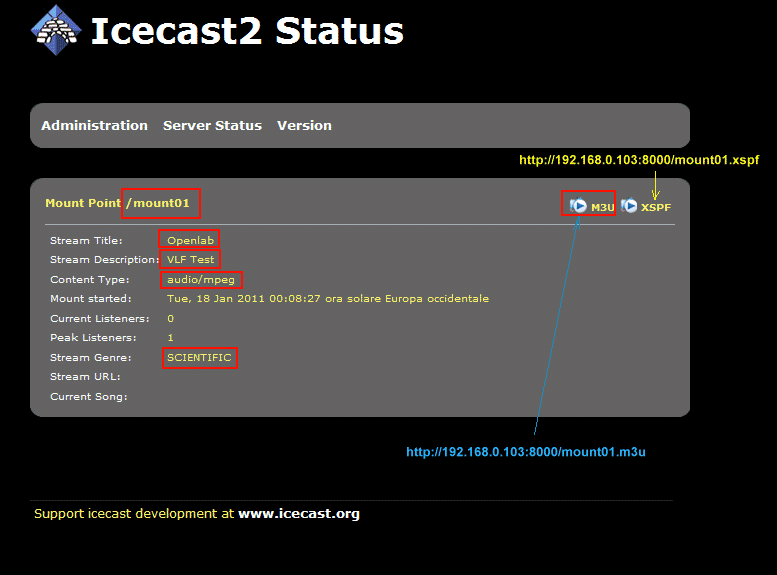
Our stream is active! To listen locally to our audio
transmission we can click on the M3U button: it connects us to the stream.
The program we have set up windows to play the audio file will open: Windows
Media Player, WinAmp, VLC ... playing our stream. The address pointed to
can be:
http://localhost:8000/mount01.m3u
or
http://192.168.0.103:8000/mount01.m3u
(where 192.168.0.103 is the local IP address)
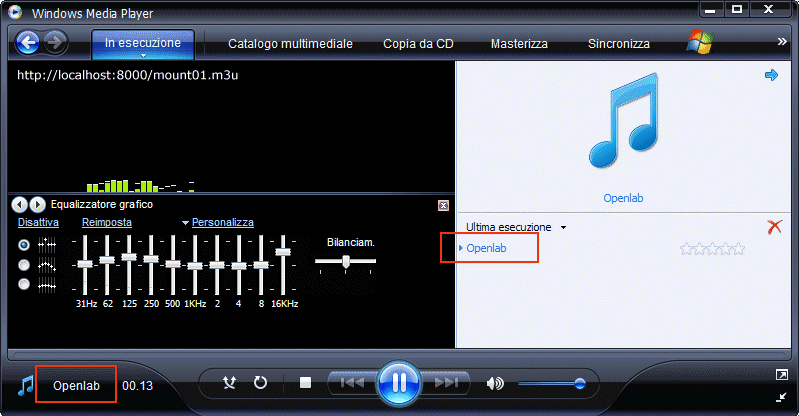
The stream title (in my case) “Openlab” will show
in the “Media Player Window”.
THE STREAM BECOMES
PUBLIC
We have created a web radio with our VLF signal.
How do we make it visible from the outside? To do this we must replace
the “localhost” part of the URL address with the public one.
In our example: http://localhost:8000/mount01.m3u
becomes: http://
79.41.182.105:8000/mount01.m3u (where 79.41.182.105 is the public IP,
the same we found at the beginning of this article). This will be the address
that we can put on our website. Visitors can click on this link to open
up their player (VNC, Windows Media Player,Winamp ...) and they will hear
our stream.
In the same way we can make the IceCast status web
page visible on the Internet:
http://localhost:8000/status.xsl
this becomes the link for external visitors:
http://79.41.182.105:8000/status.xsl
(where 79.41.182.105 is the public IP)
WINDOWS FIREWALL
AND ROUTER VIRTUAL SERVERS
On the first attempt they could not access our
stream. There are some security locks that must be removed. If your PC
is connected to the Internet via a modem we must instruct the Windows firewall:
must allow the requests on port 8000 addressed to IceCast.
If your PC is connected to a router we must instruct the router. It should know that the calls it receives on port 8000 must be redirected to the PC that hosts IceCast. This service has different names: some call it Firewall routers, others call it "virtual server". Each router has its own set of rules but the principle remains the same for all: the calls that arrive on the Public IP port 8000 must be sent to the PC with IceCast.
This is the same job we do with Emule to work with
high priority.
DYNAMIC AND
STATIC IP
Now we need to do another test. Turn off your modem
or router, and switch on again. Then go to the page http://www.myipaddress.com/
and check the Public IP address. In the example above we found that “79.41.182.105”
was the IP public address. If the address has remained the same it means
that our address is set. We can write it in the web address of our stream:
http://79.41.182.105:8000/mount01.m3u
and it will remain this way.
But if we found the address changed, it means that our DSL has a dynamic IP address. It changes every time we turn our modem/router on or off. How do we fix this? Each time the router loses power we should change the address of the stream on the web page. A free solution exists and is called DynDNS (Dynamic DNS Free): http://www.dyndns.com/services/dns/dyndns/

As described on their website: “DynDNS Free allows you to create a hostname that points to your home or office IP address, providing an easy-to-remember URL for quick access. We also provide an update mechanism which makes the hostname work with your dynamic IP address.”
To activate the service you have to open an account, choosing a host name: it may be, for example, "john.dyndns.info”. Completing the registration you download a program to install on your PC. Once active it will get in communication with the server DynDNS keeping your IP address in sync with the host name you choose. Your public IP will always be associated with the host "john.dyndns.info”.
Your PC will be visible from the outside, as well as through the public IP (http://79.41.182.105 in the example before) even with the DynDNS hostname: http://john.dyndns.info.
Our audio streams: : http://79.41.182.105:8000/mount01.m3u
will also be accessible as http://john.dyndns.info:8000/mount01.m3u,
always.
The IP address may change but the host name will
remain the same.
CONCLUSIONS
When I did this for the first time it took a considerable
amount of time. I had no information on how to do it. I did not know what
a stream server was and did not know how to transform a signal wave in
MP3. Fortunately many friends came to my rescue. I hope this article saves
you some valuable time. Again, this information suggests one way to activate
an MP3 stream, but it is not a fixed rule: there are many ways to get the
same results. But if you've never done it before... I hope this will be
of help to you.
THANKS TO
Luca Seoli and all the CSP team for IT support
and Dave Ewer for grammar revision.