...and share your data with the science community.
by Renato Romero
If you have created your
VLF observatory and it works regularly acquiring data on VLF activity,
it is natural that you may wish to share the data with other researchers.
Who knows how many times we went on the web page of a university, and we
looked at the data acquired from their systems. In this article we see
how to build our own local VLF acquiring station as a Web Observatory
with data on line. It sounds difficult, but, its actually quite easy!
The shopping
list
Here is the list of things needed to activate a
monitoring station on-line
- an active VLF Observatory (see the article How
to start up a VLF observatory)
- an ADSL connection with a flat account
- some software: a list will follow
- a subscription with an ISP to have a web space
- a little dedication and... a bit of good will
 |
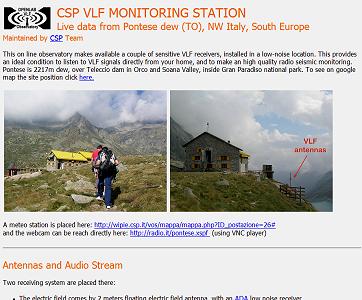 |
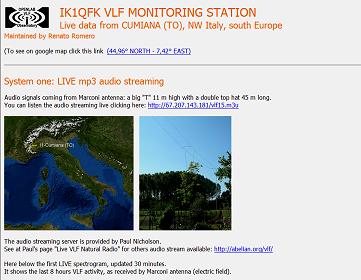
In the picture the home pages of two VLF On-Line
Observatories in North West Italy:
Cumiana station (http://www.vlf.it/cumiana/livedata.html)
Pontese station (http://radio.it/vlf/pontese/pnts_observatory.htm)
The broad Band
Line
A high speed Internet connection is essential:
it will need to transmit the audio stream and also the spectrograms on-line
in real time. It can be used to connect to your PC remotely if you notice
that something is not working and you are not home. Fortunately, you dont
need big numbers: 560 kb download and 125 kb upload speed are enough. These
are common features of any basic ADSL. The type of commercial contract
should be FLAT with unlimited traffic. The output audio stream will use
the resources of your line 24 hours a day: same as a file sharing software
like emule. Your provider should not oppose this. Finally: an ADSL with
a dynamic IP is fine; we do not need a more expensive fixed IP.
Internet provider
subscription and web space
To have an ADSL line you need to create an account
subscription with an internet provider. Please ensure that web space is
also included with your subscription. To activate the observatory on-line
does not require much space: the Cumiana observatory page contains a lot
of data but occupies only 0.75 MB of web space. Most providers, with
a subscription on-line offer free web space of 50 Mb, which is sufficient
to publish more than 70 VLF Online Observatories, ...but I'm sure you will
stop before that.
The web space must be accessible by a FTP procedure.
Some providers offer the opportunity to update their page only through
a web interface (via web browser through the pages of a web site): for
the observatory on-line that is not enough, you need to have an FTP access.
Generate spectrograms
picture for the web
The spectrograms saved in our database are not
suitable for publication on the web. They always have a different name
that identifies them. To publish the image on the web it must always have
the same name. You must add this scheduling to Spectrum Lab: it must be
instructed to periodically save a picture with the same name, in addition
to those already stored in the archive.
For this operation, the command can be entered as
Periodic Action or as Scheduled Actions.
The commands capture and plot.capture save
respectively as a picture the spectrogram and the plotting, always with
the same name, this is indicated: (name of the file). With this schedule
at every hour the old images are overwritten by new ones. The two images
with the same name always show the current situation. In the example every
60 minutes are two saved pictures: last-geomar.jpg and last-plotted.jpg.
They are saved in the Spectrum folder, corresponding to the SpectrumLab
session that created them.
Editing the Web Page
To have a web page on the Internet we must first
edit the page locally. We need a web page editor. If in your job you do
not have access to professional software such as Dreamweaver or Frontpage
do not despair: there is a free software that will do exactly what we need.
It is SeaMonkey. It is basically a Web-browser, advanced e-mail, newsgroup
and feed client, IRC chat... and also contains a simple but complete HTML
editor. It is easy to use. You can download SeaMonkey here: http://www.seamonkey-project.org/
 |
 |
(To convert the Italian text in several of these boxes: Open Google. Type in Convert Italian to: name your language. Then insert the word/text for conversion. Example from a box below: composizione avanzata English translation: advanced composition.)
When opened it looks like a web browser (it is the renewed version of the old Netscape Communicator). Select Composer in the menu bar list and click on it. A white page opens. Use it exactly as you use Microsoft Word or OpenOffice Writer. Use it to compose your web page, but first of all save the page with a simple name like station.html on the primary route of your hard disk C:\.
Then edit the page with your station description, your conditions, and enter the last kind spectrograms that we have planned first as auto-saving. Click on insert picture and a picture proprietary window opens:
1 Click on Choose file and select the picture
last type in the spectrum folder and confirm
2 In the imaging address field will compare
the name of the picture and the folder that contains it
3 Select the option The URL is relative to the
page address, and type OK
Save the HTML file. Open your internet browser (Explorer, Firefox...), and open with it the file you have saved with composer on your HD, C:\station.html. It should look like this one:
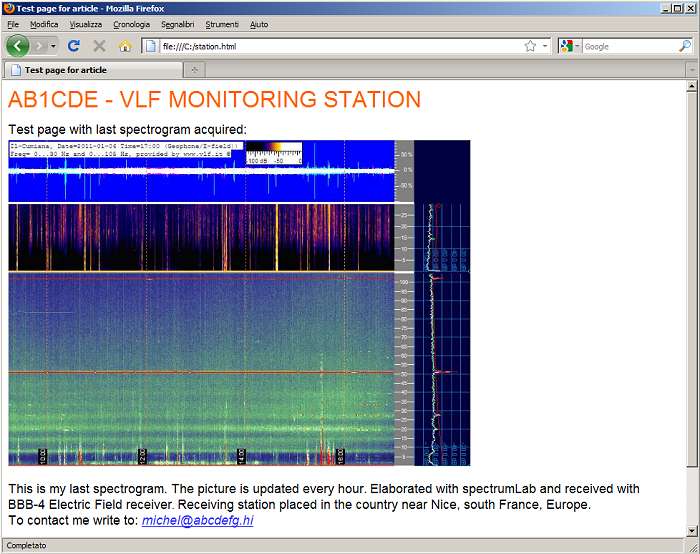
Now you have your local web page. If SpectrumLab is running as explained, opening this page you always see the last spectrogram of your observatory. Several sessions may be open in SpectrumLab, and many pictures of spectrograms may be included on the web page you just created. To do this it is necessary that every image on the web page contains the correct address with the SpectrumLab folder that contains it: if there is more than one session of SL installed on the PC, they will have different names, such as Spectrum1, Spectrum2, Spectrum3 ... etc.
Your new webpage can also contain other files, in addition to the spectrograms, such as a photo of the station or the antennas. To do this simply create in the root C: \ a folder named "images", and insert images to put on the page inside. With the "composer" do the same operation described above with the pictures of spectrograms, this time referring to the Folder; "images".
Html file saved with "composer" has no images, but only the reference where they are. If you must transfer them to your new webpage (for example in a USB key) it is therefore important not only to move the html files but also folders containing images of the page. This is important when we want to make our page available to Internet users. We will have to transfer all the work done to a remote server, given by our service provider, through a process called FTP. Do not forget anything: html file with structure folders and pictures, otherwise the page view from the Internet may be missing some components.
It is all installed on our local PC and only we
can see it. But it is an exact copy of what we want to make visible from
outside. Now you only need to transfer all this to the web, and synchronize
files periodically. Let's see how its done.how its done.
Transferring
our new page on the Internet
To do this we need a program that works as an FTP
Client. But before working with it we must have some data our provider
has assigned to us with the web space. They are:
- an FTP address: for example ftp.superweb.com
- an user-id and password: for example johnb and
018fgc445
- a web address where you will see our page, for
example http://www.superweb.com/johnb/
Now we can proceed. Download the program "FileZilla"
from http://filezilla-project.org/index.php
Be sure to download the program FileZilla Client
(not the server Filezilla). Install it on your PC. When installation is
complete run the program:
Enter the FTP connection data: server name, user-id, password and port (usually # 21) and click on quick connect. The program connects you with the remote server. When you are connected, copy the contents of the left part corresponding to the files you edited on your PC first, in the right side corresponding to the remote server. Transferring files is easy, just like the Windows File Manager, by drag and drop.
On the right side of FileZilla you can see your
website and files online. Following the address of the example above you
can see your page on the Internet at:
http://www.superweb.com/johnb/station.html
If you did a good job, even your pictures are visible,
and your monitoring station is visible to the world. Now you can tell your
friends. But the page is static and the spectrograms are not updated automatically.
Every hour we should start FileZilla and copy images from your PC to the
remote server. Obviously this is not possible. We need another piece of
software that maintains the synchronized "last" type images saved by Spectrum
Lab on your PC with the remote server. Here we go.
Picture synchronizing
We can make this synchronization using a backup
software: it must accept the scheduled tasks and handle the FTP protocol.
One of these programs is GoodSync and you can download it from this address:
http://www.goodsync.com/
It comes in two versions. The free version has
some limitations: the number of Files in a Sync Job after trial period
is 100 or less and the number of Sync Jobs after trial period becomes 3
or less (they are unlimited in Pro Version). The Free version requirements
are enough for our work.
Once you install the software run it. Open a new job, give it a name (test for article in the example below) and select the backup modality. Now the first thing to do is to define the source:
Click on the Browse button top left (1)
Select the first modality my Computer (2)
Select the folder Spectrum where the last type
of picture is saved by spectrumLab (3)
Confirm with OK (4) and verify the correct path
is reported in the field (5)
Now we define the destination, which is the FTP server:
Click on the Browse button top center (1)
Select the FTP modality (2)
Type the FTP server name (3)
Type FTP user-id and password (4) and click Go
(5)
Now we see what we have put on Filezilla (6)
Select the same for destination as you have in
the source
Confirm with Ok (7)
Verify the correct path is reported in the field
(8)
And last we must define filters and timing. The filters are needed: they must avoid copying the entire contents of the Spectrum folder on the FTP server. We just have to copy one or two images.
Click on the arrow button (1)
Select Filters modality (2)
Type in the include window the name of the files
to be copied (3)
Set the conditions as indicated (4)
And Last we set the timing:
Select the Auto modality (1)
Select a proper time and set the Sync option (2)
Confirm with ok (3)
Now your software synchronization knows what to
do. The images that SpectrumLab saves every hour will be transferred to
the remote server and will be visible on the web. Your observatory is on
line! The appetite grows by eating and soon your monitoring station will
provide many signals to keep GoodSync busy.
Here, for example is the GoodSync screen
in operation at Cumiana monitoring station:
GoodSync is not the only program available for this
operation. Other free software may be used such as SyncBack or AllSync.
But the operating conditions are very similar.
CONCLUSIONS
We have now seen how to put a monitoring station
online. This information suggests some ways to do this. It is not a fixed
rule: there are many ways to get the same results. But if you've never
done it before... this will be of great help. I know what you're thinking:
I wonder if it is very difficult to create an online audio stream? But
that's another story.
THANKS TO
Luca Seoli and all the CSP team for IT support
and Dave Ewer for grammar revision.